An important reason to use NWA Quality Monitor for data entry is its ability to provide real-time alarms and to perform actions based on the alarms. The real-time alarms give you immediate visual and/or audio feedback on product quality. Quality Monitor can automatically save the alarm list, send an email, or perform other actions immediately or upon the completion of the record.
Setting up the alarming routines in Quality Monitor is generally straightforward, and is covered in Chapter 3, under Defining Alarms, in the NWA Quality Monitor Configuration Manual. However, three topics that benefit from further explanation are:
- Order of precedence
- Fixed-control-limit alarms for subgroups and ranges
- Alarm actions when data entry is completed for a sample
Order of Precedence
When Quality Monitor tests for alarm conditions for a given variable, it starts with the first test listed in the alarm definition. It then processes each of the tests in order. If more than one test fails, the definition of the last test failed will be used to set the background color of any related input or display field for the variable.
If the different tests also set the value of another variable when an alarm is triggered, if they set the same variable, the value set in the last test failed will be used. While this is not a concern if you are only testing against the upper and lower limits of one type of limit (i.e., only testing against upper and lower specification limits or against upper and lower control limits), it is important if you are testing one variable against multiple limits (i.e., testing against both specification limits and individual control limits).
As an example, we will use a Screen that collects data for a single individual variable called length. For this variable, the following alarm tests are performed in this order:
- Greater than USL
- Less than LSL
- Greater than UCL
- Less than LCL
In this example, the color of the control limit alarm will be set to yellow (indicating that we want the technician to investigate as soon as possible) and the color of the specification alarm will be set to red (indicating that we want the technician to drop everything and investigate immediately).
When a value is entered that is above the USL, the background color of the input field would normally turn red indicating the out-of-specification condition. However, since the value is also above the UCL and that test was performed after the test against the USL, the control limit alarm's color is used instead and the input field background is yellow (Figure 1).

Figure 1: Example of Incorrect Alarming
This is more of a concern for Screen designs that do not include Alarm Lists or Alarm Indicators. For Screen designs that use alarms to set other variables this can be critical, but it is easy to correct since the Alarms Settings dialog box lets you easily move a selected test up or down in the list of alarms (Figure 2).
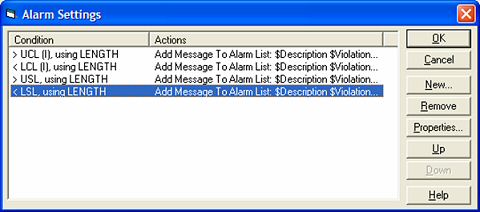
Figure 2: Corrected Alarm List
Fixed-Control-Limit Alarms for Subgroups and Ranges
When setting SPC alarms for any variable, you can select the chart type, in addition to specification limits, from which to read the value to test. You can also select whether the program uses dynamically calculated control limits or fixed limits defined in the Screen or taken from the header (HED) file.
In a Screen like the example above, you can test the input variable against both the specification limits and the individual chart control limits. This is valid and a good way to handle such tests, however you can get into trouble if you also try to test measurement values against the range control limits or an individual element of a subgroup against the X-bar chart limits.
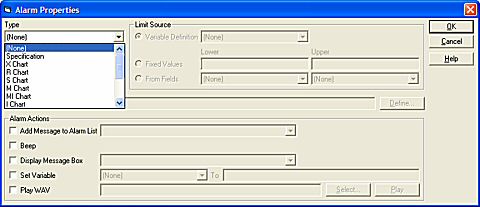
Figure 3: Some of the Available Types of Tests
If the test uses calculated control limits, Quality Monitor would correctly determine when a value fails a test and report it. Quality Monitor simply reports what the SPC calculation has returned, and if it returned violations matching the alarm definitions, it will report them and take the appropriate actions.
Quality Monitor operates differently with fixed limits. Quality Monitor does a straight numerical comparison of the individual element and the value supplied by the Limit Source. If you set up a fixed control limit test for a subgroup element, the value of the individual element is tested, not the average of the subgroup. In order to alarm on the true subgroup average when using fixed control limits, you will need to calculate the average, assign it to a variable, and set that variable’s alarm definitions.
For example, in a Screen that collects weight data in a subgroup of four, alarming against the fixed control limits will require a new variable. This can either be a standard (saved in the DAT file or database) or a temporary variable (not saved). Since the original subgroup variable is WEIGHT, we will call this new variable WEIGHT_AVG. It will be a type Ivariable and be calculated using the formula AVG(WEIGHT:1~WEIGHT:4).
We will define alarms for upper and lower X-bar control limits. The alarms are defined as normal, with one exception. Clear the Use Calculated Control Limits checkbox and, in the Limit Source area, select Variable Definition and select WEIGHTfrom the adjacent drop-down list. This tells Quality Monitor to test against the control limits defined in the HED file for the WEIGHTvariable.
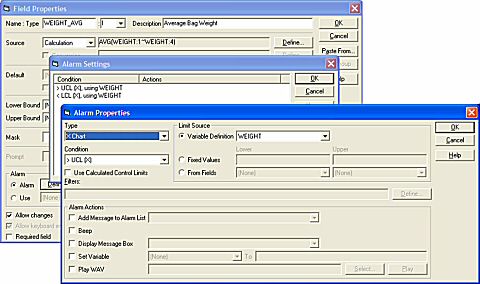
Figure 4: Setting up a Fixed Control Limit Alarm on a Subgroup Average
This needs to be considered in the design of any Screen that alarms against any fixed value. If the value to be tested is not already stored in its own variable (as in the case of subgroup averages and ranges for both individuals and subgroups) it will need to be calculated and placed into a variable, at least temporarily, to be tested.
"On Record Complete" Alarm Actions
The Alarm Properties dialog box lists five actions that can be taken by Quality Monitor when data entry is completed for a record. Each action occurs once for each test that is failed. If Quality Monitor could be configured to send an email whenever an alarm occurs on the current record, the email recipients could become overloaded with messages. As an extreme example, for a subgroup of four, if all three dimensions went out of specification and control, Quality Monitor would send 24 (4x3x2) emails with essentially the same message.
To avoid this situation, sending an email alarm is included in a class of actions that are only performed when a record is completed and saved.
This class of actions includes:
- Chart
- Delay
- DOS Shell
- Execute RUN File
- Exit Quality Monitor
- Quick View
- Save Alarm List
- Send DAT
- Send Email
- Start a Windows Program
- Transmit
You can configure these actions by opening the Settings menu and selecting On Record Complete. Clicking the New button in the On Record Complete Settings dialog box displays the On Record Complete Properties dialog box (Figure 5).
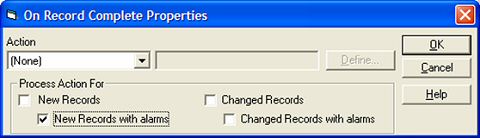
Figure 5: On Record Complete Properties dialog box
If you clear the New Records check box and select the New Records with Alarms check box, any action you select from the drop-down list will only be performed for new records in which one or more alarms occurred. To set up an alarm email, select the New Records with Alarms checkbox, select the Send Email Action, click the Define button, and fill in the fields with the relevant information.
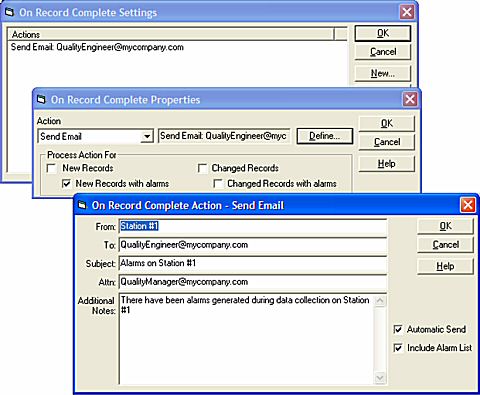
Figure 6: Sample Alarm Email
Since these actions only occur when the record is saved, they only happen once, instead of once for each alarm. This class of action is often used for the email function, for requiring operators to look at the charts, or for executing a third-party application when an alarm is triggered. This extends the power of alarms tremendously.